|
Photopoints are permanent or semi-permanent sites from where you take a series of photographs over time to monitor short term or long term physical changes. For comparison, the pictures need to be taken at the same location, with the same direction (south is best but not always practical), angle, focus points and preferably camera settings. Photographic records provide a permanent visual record of change on your property without reliance on memory or taking physical measurements. Other advantages include low capital and time requirements and little impact on surrounding areas or ongoing management.
Types of photopoints
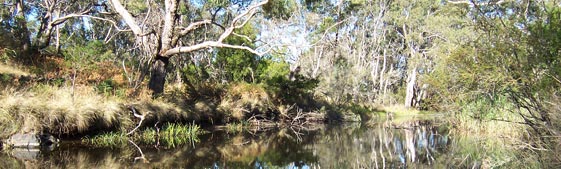
Choosing which of the three key types of photopoints described below – spot, trayback, and landscape – will depend very much on what you want to monitor. Often a combination is best across the farm.
|
The spot photo
This is a photo taken from head height looking nearly vertically down on a spot marked with a 1m x 1m frame as shown in Figure 1. Spot photos provide a detailed picture of the groundcover, litter and plant species for a standard sized area. If there is great variety at the site, take several spot photographs but ensure they are marked so that you return to the same spot next time.
|

Figure 1: Taking the spot photo – try and keep the top of your feet out of the frame, and angle the camera down as straight as possible
|
|
The ‘trayback’ photo
The trayback photograph is taken standing on the back of a ute tray or on a step ladder. The vehicle (or step ladder) is positioned at the photopoint post (Figure 2). Focus the middle of the viewfinder on the base of the sighter post located 10m to the south of the photopoint post. The photopoint post and the sighter post are left permanently in place.
This photo angle will best illustrate ground condition and the amount of feed available in a pasture. It can also show the amount, type and condition of nearby vegetation or the condition of a small gully.
|
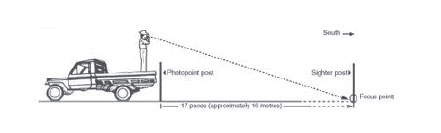
Figure 2: Taking the ‘trayback’ photo with viewfinder centred on the base of the sighter post.
|
|
The landscape photo
Setting up a landscape photo can be simple using two permanent posts a distance apart (Figure 3). Sometimes it may be more appropriate to use landmark features which can be matched up with in future pictures instead of (or as well as) the sighter post. Stand next to the photopoint post as shown in Figure 3, position the top of the sighter post in the middle of the viewfinder and focus on infinity.
Landscape photos will best illustrate the general condition of the site showing major changes in shrub and tree populations, such as a time series taken to show hillside revegetation or repair of gully erosion.
|
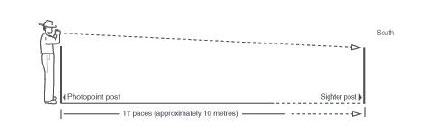
Figure 3: Taking a landscape photograph from a photopoint marker, with the top of the sighter post in the centre of the viewfinder and focus on infinity.
|
Some final tips
- Make sure the top quarter of each post (photopoint posts and sighter posts) is painted bright white or yellow for safety purposes and for locating them each time.
- Mark each photopoint with a unique number which is useful for identifying the site and for keeping records. Sheep eartags can be good identifiers.
- Where practical, you can double the value from your photo points by standing at the sighter post and taking a photo back towards the photopoint marker. This second shot will give you a different perspective from the same site.
- Mark a post in an existing fenceline as your photopoint post, and sight your photos using a landscape feature to avoid problems with stock rubbing on a lone sighter post in the paddock.
- Take a hard copy of previous pictures with you to make lining up the shots easier, especially if you are using landscape features instead of a sighting post.
- Label the back of the initial photographs taken at each location, marking plants or features of interest to be monitored for change over time. Include these photographs in your field notebook to help you shape the photos on later visits.
- Take two photos or more per year at the sites, preferably in contrasting seasons.
- Don’t include too much sky as it won’t change. For landscape and tray photos, fill the photo with at least 4/5 land and vegetation and no more than 1/5 sky.
|